

Portable air conditioners are a fantastic solution for keeping your space cool during hot summer months, and they are especially valuable for those who need flexibility in their cooling system. Like any other appliance, regular maintenance is crucial to ensure optimal performance, longevity, and efficiency. One of the most important aspects of maintaining your portable air conditioner is cleaning it properly. This guide will show you how to clean a portable air conditioner in detail, helping you keep your unit running smoothly and efficiently.
Why Cleaning Your Portable Air Conditioner Is Important
Before diving into the step-by-step process of cleaning your portable air conditioner, it’s essential to understand why this task is crucial. A dirty air conditioner can lead to several issues, including:
- Reduced cooling efficiency
- Higher energy consumption
- Increased wear and tear on internal components
- Unpleasant odors due to mold and mildew
- Poor air quality, potentially triggering allergies or respiratory issues
Regular cleaning prevents these problems and ensures that your air conditioner operates at peak performance.
Step 1: Unplug the Unit
Safety first! Before you start cleaning your portable air conditioner, make sure the unit is completely powered off and unplugged. This will protect you from electrical shocks and ensure that the unit is safe to handle.
Step 2: Clean or Replace the Air Filter
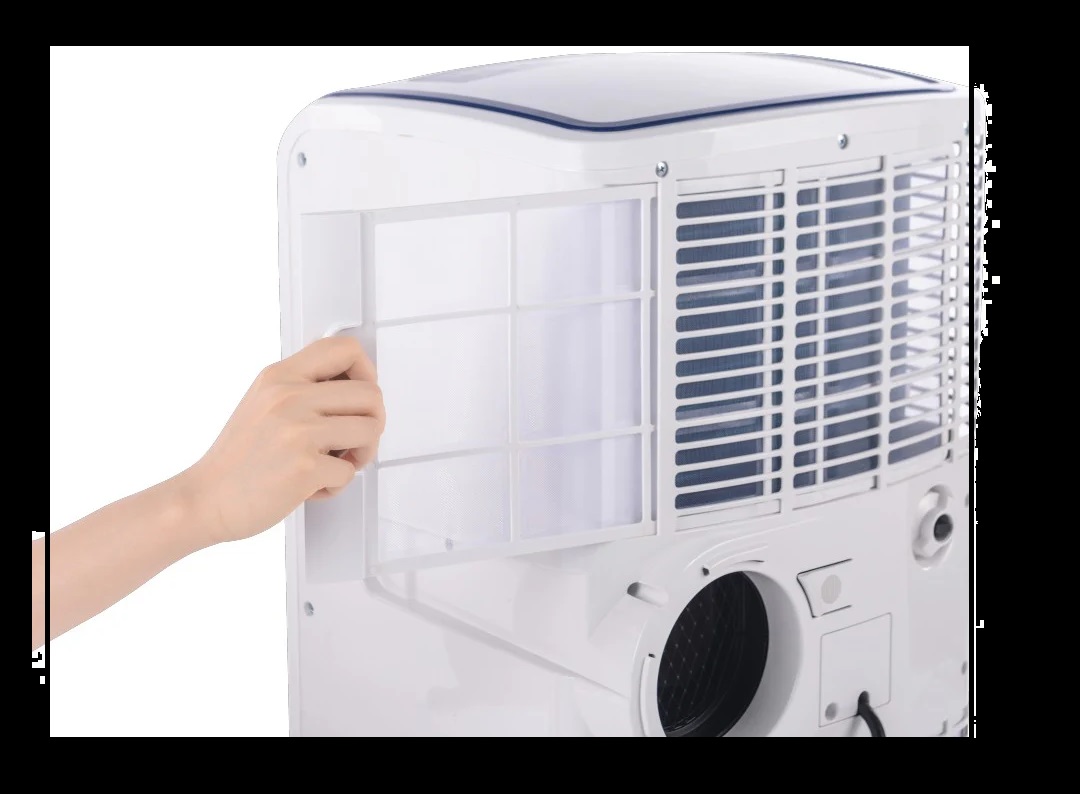
One of the most critical components of your portable air conditioner is the air filter, which traps dust, debris, and allergens. Over time, the filter can become clogged, reducing airflow and the unit’s ability to cool effectively.
Here’s how to clean the air filter:
1. Locate the Filter
Check your air conditioner’s user manual to locate the air filter. It’s usually accessible behind a panel on the back or side of the unit. Remove the panel carefully to expose the filter.
2. Inspect the Filter
Examine the filter for signs of dirt, dust, or damage. If it’s worn out, you may need to replace it with a new one. However, if it’s simply dirty, you can proceed with cleaning it.
3. Wash the Filter
Rinse the air filter with warm water. For stubborn dirt or grime, you can use a soft brush and mild soap to clean it thoroughly. Be gentle to avoid damaging the filter. Avoid using harsh chemicals that can degrade the material.
4. Dry the Filter
Once the filter is clean, let it air dry completely before reinserting it into the air conditioner. Replacing a wet filter could cause mold to grow inside the unit, which can lead to poor air quality.
Step 3: Drain the Water Tank
Portable air conditioners often come with a water tank that collects condensation produced during the cooling process. Depending on how frequently you use the unit, this tank can fill up quickly, so it’s essential to drain it regularly to prevent leaks or water damage.
Here’s how to drain your portable air conditioner:
1. Locate the Drain Plug
Your unit will have a drain plug, typically near the bottom. Again, refer to the user manual to locate it.
2. Prepare to Drain
Place a shallow pan or container underneath the drain plug to catch the water. Some units come with a hose that allows you to drain the water directly into a bucket or sink.
3. Remove the Plug
Unscrew or remove the drain plug and let the water flow out. Once the water is drained, replace the plug securely.
Step 4: Clean the Exterior of the Unit
The exterior of your portable air conditioner can collect dust, dirt, and grime over time, impacting its overall cleanliness and function. Cleaning the exterior is simple but important for keeping your air conditioner in top shape.
Here’s how to clean the exterior:
1. Wipe Down the Surface
Use a soft, damp cloth to wipe down the exterior surfaces of the unit. For tougher grime or stains, use a mild detergent, but avoid harsh chemicals that could damage the plastic housing.
2. Check the Vents
Dust and debris can accumulate in the vents, which can block airflow and reduce cooling efficiency. Use a vacuum cleaner with a brush attachment or a soft brush to gently clean the vents. Be careful not to push dirt further into the unit.
Step 5: Clean the Evaporator and Condenser Coils
The evaporator and condenser coils are crucial for the cooling process as they transfer heat. Over time, however, these coils can become dirty or clogged with dust, reducing the air conditioner’s efficiency.
Read More: What to Know Before Buying Your First Home
Cleaning these coils is a bit more involved, but it’s a necessary step for maintaining your portable air conditioner. Follow these steps:
1. Access the Coils
To access the evaporator and condenser coils, you may need to remove a panel on the back of the unit. Refer to your user manual for specific instructions.
2. Vacuum the Coils
Using a soft brush attachment on your vacuum cleaner, carefully remove any dust or debris from the coils. Be gentle, as the coils can be delicate.
3. Use a Coil Cleaner
For a deeper clean, you can use a commercial coil cleaner, which is available at most hardware or appliance stores. Follow the instructions on the cleaner carefully, and be sure to use a product that is safe for portable air conditioners.
4. Allow the Coils to Dry
After cleaning the coils, let them air dry completely before reassembling the unit. This will prevent any moisture from causing mold or mildew to develop inside the air conditioner.
Step 6: Clean the Exhaust Hose
The exhaust hose vents warm air outside, and over time, it can accumulate dust, dirt, and moisture. Cleaning the exhaust hose will ensure that the unit continues to function efficiently.
1. Remove the Hose
Detach the exhaust hose from the air conditioner and the window kit. Check for any signs of cracks or wear that may require replacement.
2. Vacuum the Interior
Using your vacuum cleaner’s brush attachment, carefully clean the inside of the hose to remove dust and debris.
3. Wipe the Exterior
Use a damp cloth to wipe down the outside of the hose, ensuring that any dust or dirt is removed.
4. Reattach the Hose
Once the hose is clean and dry, reattach it securely to the air conditioner and the window kit.
Step 7: Check for Mold and Mildew
One of the main concerns when cleaning a portable air conditioner is the potential for mold and mildew growth, especially if the unit has been exposed to moisture for an extended period.
1. Inspect the Unit
Check all components, including the air filter, water tank, exhaust hose, and coils, for any signs of mold or mildew. Common indicators include a musty odor or visible spots of black or green growth.
2. Use a Mold Cleaner
If you detect mold, use a specialized cleaner designed to remove mold and mildew from appliances. Be sure to follow the product instructions carefully, and wear gloves and a mask to protect yourself from mold spores.
Step 8: Reassemble and Test the Unit
After you’ve completed all the cleaning steps, it’s time to reassemble your portable air conditioner and test it to ensure everything is working correctly.
1. Reinsert the Filter
Once the air filter is completely dry, reinsert it into the air conditioner. Make sure it’s securely in place before continuing.
2. Reconnect the Exhaust Hose
If you removed the exhaust hose for cleaning, reattach it to the unit and the window kit.
3. Turn On the Unit
Plug the air conditioner back into the power outlet and turn it on. Check to make sure that it’s running smoothly, with no strange noises or odors. If everything looks and sounds good, you’re ready to enjoy the cool air.
Tips for Keeping Your Portable Air Conditioner Clean
- Clean the Air Filter Monthly: The air filter should be cleaned every month or more frequently if you use the air conditioner regularly.
- Empty the Water Tank Frequently: During humid weather, the water tank may fill up quickly, so it’s essential to empty it regularly.
- Store Properly in Off-Season: If you’re not using your air conditioner during cooler months, be sure to store it in a cool, dry place. Clean it before storage and cover it to protect it from dust and debris.
Conclusion
Knowing how to clean a portable air conditioner is key to ensuring its efficiency, longevity, and the quality of air it provides. By following these detailed steps regularly, you can avoid common issues like reduced cooling capacity, higher energy bills, and unpleasant odors. Not only will your air conditioner last longer, but it will also create a healthier environment in your home or office. Remember to clean the air filter, drain the water tank, and check for mold regularly to keep your unit running at its best.
Apart from that, if you want to know about Portable Battery Fans: The Ultimate Guide to Stay Cool Anywhere, Anytime then please visit our Home Improvement Category.